README

November 11, 2008

I finally got around to building a README for how to deploy this blog on your own Google App Engine account.

Source: http://github.com/bgolub/blog/tree/master

How to Deploy:

1) Get a Google App Engine account at http://appengine.google.com
2) Create a new application.  Note your application identifier.
3) Edit the included app.yaml.sample:
    i) Change the text APPLICATION_IDENTIFIER to the application identifier
    created in step 2.
    ii) Rename it to app.yaml
4) Edit the included settings.py.sample:
    i) Variables are self explanatory.
    ii) Rename it to settings.py
5) Edit base.html to make it your own (optional).
6) Deploy!
    i) Via command line:
        Move to the directory containing app.yaml and do "appcfg.py update ."
    ii) Via GoogleAppEngineLauncher (for Mac):
        Drag the directory onto the window, click on the app, hit deploy!
7) Start blogging by visiting http://your_blog_url/new
    i) That will prompt you for your Google Account.  Login with the same one
    you use to login to http://appengine.google.com.  Only that account can
    add/edit/delete posts.
8) Let me know that you're using it :)  [email protected]
Current Location

November 9, 2008

I travel a lot more than I used to. You can now keep track of where I am (approximately) in the sidebar of this blog. The data is pulled from my Dopplr account and represented using a Google Static Map.

def get_current_city(self):
    key = 'current_city/now'
    current_city = memcache.get(key)
    if not current_city:
        response = urlfetch.fetch("https://www.dopplr.com/api/traveller_info?format=js&token=" + settings.DOPPLR_TOKEN)
        if response.status_code == 200:
            data = simplejson.loads(response.content)
            current_city = data["traveller"]["current_city"]
            current_city["maps_api_key"] = settings.MAPS_API_KEY
            memcache.set(key, current_city, 60*60*5)
        else:
            current_city = None
    return current_city

Icons

October 27, 2008

I'm terrible with using images so it's a big deal when I add icons to a project. I'm using FAMFAMFAM Silk Icons.

2009 Civic Review Part 1: The Dashboard

October 26, 2008

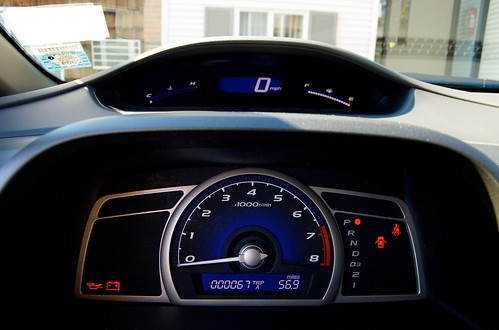
Because I don't have time to write one giant review I thought I'd divide it up into logical sections. Here's my review of the Civic dashboard.

New 2009 Honda Civic LX

First and foremost it's obvious that you're either going to love or hate it; there's no middle ground here. The two-tiered design is definitely not for everyone. Honda moved the important information (for an automatic car at least) to the top tier which is extremely visible while driving. The bottom tier holds less important information like your tachometer (which is much too large) and status lights. The (arguably) 3 most important pieces of information (engine temperature, speedometer, and fuel gauge) are front and center.

While driving you do not need to take your eyes off the road to check your speed. I found myself much more able to keep a steady pace in the Civic because I'm constantly aware of how fast I'm going. I suspect this might also make Civic owners less likely to speed.

For a whole week my main complaint about the dashboard was that it was way too bright at night. Thankfully last night I found that I had the brightness cranked all the way up. Dropping down just one level made a world of difference.

Personally, I love the dashboard. Don't judge it just from the photos though; you really need to experience it to decide if it's for you or not.

Flipped the switch

October 25, 2008

This is now my permanent blog. The DNS may take some time to propagate but once it does you'll find yourself here instead of my old WordPress powered blog. I took some measures to make sure that anyone trying to reach my old blog will eventually get there:

class OldBlogRedirectHandler(BaseRequestHandler):
    def get(self, year, month, day, slug):
        self.redirect('http://old.benjamingolub.com/%s/%s/%s/%s/' %
            (year, month, day, slug))